

When you do a Google search for “How to make polymer clay alphabet canes”, it’s surpising how few resources mention making letters from canes.
I did find a short tutorial on Polymer Clay Central though, which showed how to make the initials “P” and “C”, but not the rest of the alphabet.
Or there was an article on Tina Holden’s “Beadcomber” blog showing how she created a monogram cane – but again that was a very specific (although lovely) cane that just incorporated her own initials.
unikatissima’s website mentioned using CityZen Cane’s mosaic “pixels” method, although again it didn’t give detailed instructions on how to create a whole alphabet.
So where can polymer clay enthusiasts find letter canes for the whole alphabet?
The only set of instructions I have found so far is a tutorial by fantastic polymer clay artist Iris Mishly:

For those who haven’t got time to make their own, I did find some sites selling canes that are pre-made and ready for you to use (e.g. here (although I think these canes may be pre-cooked??))
Free Alphabet Cane Tutorials
But that still leaves the question of “Where can I find a quick and free tutorial on how to make polymer clay letter canes?”. So in that case I will oblige!
Over the coming weeks I’ll create a basic set of instructions showing how to create each capital letter in the English alphabet. They will all be round canes, but if you’d like to know how to make square versions (or numbers, or other characters) just drop me a note via the comments or contact us form, or tweet @polymerKay.
One day I’ll develop full tutorials with proper instructions, but in the meantime, here is a basic tutorial for creating a polymer clay cane with a letter “A” design:
You will need:
- Approx. 14g white clay (i.e. quarter of a standard-sized block of clay)
- Approx. 5g black clay
Step 0: Condition the clay
Step 1: Roll the white clay into a cylinder approx 2cm in diameter

Step 2: Roll the black clay into a thin sheet by using the thinnest setting of the pasta machine.

Step 3:

Step 4:

Step 5:

Step 6:

Step 7:

Step 8:
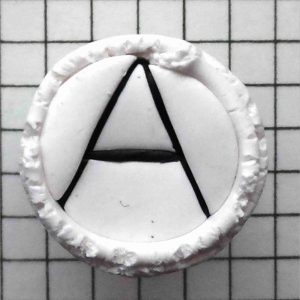
Finished letter:

If you found this tutorial useful, you can support the blog by sharing it on social media or linking to it from your own website. And if you’d like to receive the tutorials and other content as emails, please sign up for the newsletter.